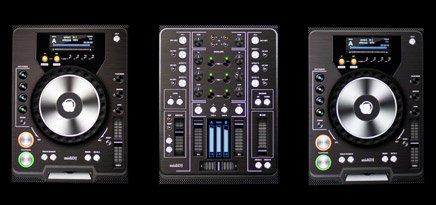
Midi DJ
Midi Dj - is a midi controller for such DJ software as Traktor Pro, Deckadance 2, Mixxx, Torq etc.
Let's see application’s connectivity and setup at the example of the iPad in conjunction with the known DJ software Traktor Pro 2.
For Mac OS X users:
1. First of all you need to connect the iPad as a MIDI device to the computer. For that, your computer and the iPad should be connected to the one WiFi network. Launch the Midi DJ application on your device and open the ‘Midi Studio’ app on your Mac OS X.
Choose the icon – «Network»
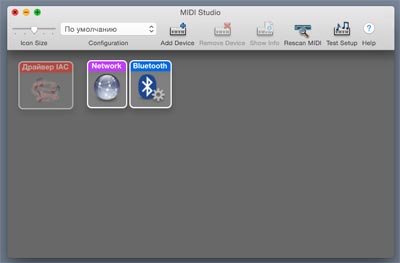
2. Create a session as shown on the screenshot below, rename it, e.g. «Session1».

Turn on the necessary checkboxes, so as the session created could work. In the section «Directory» there should appear the name of your iOS device, choose it and press the button «Connect». The device should be connected to your computer. While pressing the different buttons in the Midi DJ application you must see the latency time at the scale at the bottom right. If you see the red stripes, which appear after pressing the buttons, it means the device sends the MIDI commands to the computer successfully and is ready for work with the programs, which support the MIDI control.
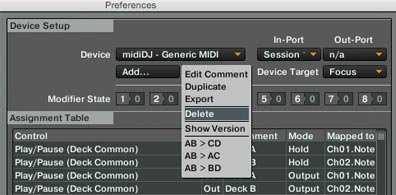
3. Launch the Traktor Pro software. Go to the «Preferences -> Controller Manager», and remove all the controllers from the list.
4. If you know how to assign the commands to different buttons of the controller, you may do it by your own at your taste, but if you are new to this or simply do not want to waste much time on the setup of MIDI commands, we recommend you to download the ready-to-use file with the settings of the full functioning of the Midi DJ application along with Traktor Pro 2. The description of how to do it you may find in the following paragraph.
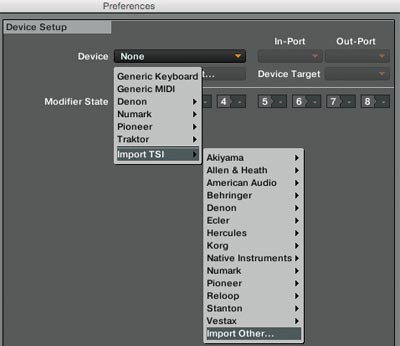
5. Download the file midiDJ.tsi, press «Add», «Import TSI - >Import Other…». Find a place, where you have downloaded the file with settings, choose it and add to the Traktor Pro software.
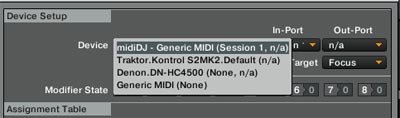
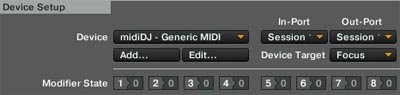
6. Choose the imported profile «midiDj-Generic MIDI» and indicate the In-Port and Out-Port, having chosen «Session 1». The name of the ports should be the same as the name of the session, which you have created in the paragraph 2.
At this point you may close the settings page and play with different regulators on the iPad. The Traktor Pro software should react to your pressings. With each receiving of the MIDI command there should be indicator “CTRL” lighted.

Additional functions of Traktor Pro 2.
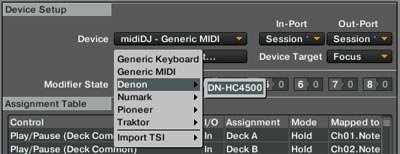
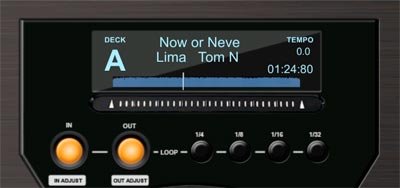
7. Midi DJ can show the names of the tracks, time and current track position. It is very convenient when you are away from the computer and are not able to look at the monitor screen. In order to turn on this function, you are to open the window of the "Preferences" of the Traktor Pro 2 software, choosing a page “Controller Manager” and add the controller Denon DN-HC4500. The Out-Port should be indicated also in «Session 1», In-Port should be «None».
Next time when you will play out the tracks in Deck A or B, you may observe the information similar to the below:
Hint 1 You may connect up to three iPads at the same time, choosing in each one Deck A, Mixer and Deck B, accordingly. By doing this you will be able to imitate an authentic DJ-console.
Hint 2: At the beginning of work with the Midi DJ and Traktor Pro softwares, it is preferable to launch Midi DJ first, and then Traktor Pro. This will allow all the regulators of Midi DJ return to their suitable position from the start.
Hint 3: If you decided to have a party, it's better to turn off the lock screen of your iPad, so as it would not turn off during your set. You can do this going to the iPad's settings, the page «General -> Auto-Lock» and choose «Never». Please don't forget to restore the settings back, otherwise your screen will be lighted until you turn it off or the battery is low.
For Windows users
1. The setup for Windows is very much alike for Mac OS X, though instead of «Midi Studio» software for Mac, you need to download and setup the program rtpMidi, which may be easily found in the internet. Its interface visually reminds the Mac OS X version.
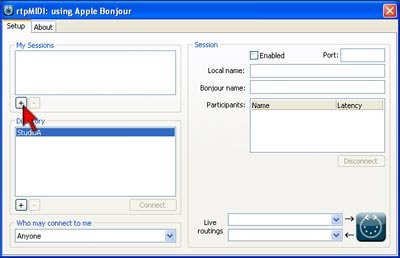
2. Launch the application Midi DJ on your device, run the program rtpMIDI and create a session under the name «Session1», turn on all the necessary checkboxes, as in paragraph 2 for Mac OS X settings. Most likely, in the section «Directory» you will not see your iOS device. You should add it via its IP address, for that you need to enter WIFI settings of your iPad, choose the network and see which IP address shows your device.
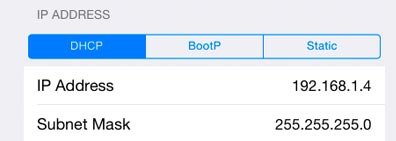
3. Press on the «+» at the bottom left in the section “Directory” and add your device, at the top field “Name”, select its name «iPad», at the bottom field enter your address, in our case it is 192.168.1.4:5004. It is necessary to indicate the number of port through the colon. Save the settings and press “Connect”. If the connectivity was successful, you will see the delay time during the transmission in milliseconds (ms). Further application’s setup is the same as for Mac OS X.
Let's see application’s connectivity and setup at the example of the iPad in conjunction with the known DJ software Traktor Pro 2.
For Mac OS X users:
1. First of all you need to connect the iPad as a MIDI device to the computer. For that, your computer and the iPad should be connected to the one WiFi network. Launch the Midi DJ application on your device and open the ‘Midi Studio’ app on your Mac OS X.
Choose the icon – «Network»
2. Create a session as shown on the screenshot below, rename it, e.g. «Session1».
Turn on the necessary checkboxes, so as the session created could work. In the section «Directory» there should appear the name of your iOS device, choose it and press the button «Connect». The device should be connected to your computer. While pressing the different buttons in the Midi DJ application you must see the latency time at the scale at the bottom right. If you see the red stripes, which appear after pressing the buttons, it means the device sends the MIDI commands to the computer successfully and is ready for work with the programs, which support the MIDI control.
3. Launch the Traktor Pro software. Go to the «Preferences -> Controller Manager», and remove all the controllers from the list.
4. If you know how to assign the commands to different buttons of the controller, you may do it by your own at your taste, but if you are new to this or simply do not want to waste much time on the setup of MIDI commands, we recommend you to download the ready-to-use file with the settings of the full functioning of the Midi DJ application along with Traktor Pro 2. The description of how to do it you may find in the following paragraph.
5. Download the file midiDJ.tsi, press «Add», «Import TSI - >Import Other…». Find a place, where you have downloaded the file with settings, choose it and add to the Traktor Pro software.
6. Choose the imported profile «midiDj-Generic MIDI» and indicate the In-Port and Out-Port, having chosen «Session 1». The name of the ports should be the same as the name of the session, which you have created in the paragraph 2.
At this point you may close the settings page and play with different regulators on the iPad. The Traktor Pro software should react to your pressings. With each receiving of the MIDI command there should be indicator “CTRL” lighted.
Additional functions of Traktor Pro 2.
7. Midi DJ can show the names of the tracks, time and current track position. It is very convenient when you are away from the computer and are not able to look at the monitor screen. In order to turn on this function, you are to open the window of the "Preferences" of the Traktor Pro 2 software, choosing a page “Controller Manager” and add the controller Denon DN-HC4500. The Out-Port should be indicated also in «Session 1», In-Port should be «None».
Next time when you will play out the tracks in Deck A or B, you may observe the information similar to the below:
Hint 1 You may connect up to three iPads at the same time, choosing in each one Deck A, Mixer and Deck B, accordingly. By doing this you will be able to imitate an authentic DJ-console.
Hint 2: At the beginning of work with the Midi DJ and Traktor Pro softwares, it is preferable to launch Midi DJ first, and then Traktor Pro. This will allow all the regulators of Midi DJ return to their suitable position from the start.
Hint 3: If you decided to have a party, it's better to turn off the lock screen of your iPad, so as it would not turn off during your set. You can do this going to the iPad's settings, the page «General -> Auto-Lock» and choose «Never». Please don't forget to restore the settings back, otherwise your screen will be lighted until you turn it off or the battery is low.
For Windows users
1. The setup for Windows is very much alike for Mac OS X, though instead of «Midi Studio» software for Mac, you need to download and setup the program rtpMidi, which may be easily found in the internet. Its interface visually reminds the Mac OS X version.
2. Launch the application Midi DJ on your device, run the program rtpMIDI and create a session under the name «Session1», turn on all the necessary checkboxes, as in paragraph 2 for Mac OS X settings. Most likely, in the section «Directory» you will not see your iOS device. You should add it via its IP address, for that you need to enter WIFI settings of your iPad, choose the network and see which IP address shows your device.
3. Press on the «+» at the bottom left in the section “Directory” and add your device, at the top field “Name”, select its name «iPad», at the bottom field enter your address, in our case it is 192.168.1.4:5004. It is necessary to indicate the number of port through the colon. Save the settings and press “Connect”. If the connectivity was successful, you will see the delay time during the transmission in milliseconds (ms). Further application’s setup is the same as for Mac OS X.