HAM Radio CW Keyer - Operations Manual Part 3
Download page
Go to Part 1
Go to Part 2
7. Contest mode
To enable contest mode, you should go to Contest – Enable contest mode. The Received and Number fields appear instead of Name and QTH. The CW Keyer can make do contests with number or any other information transmission in automatic mode. Create new contest journal file at the beginning of contest - Journal – New contest journal. Let's consider different types of contests, program preferences and sequence of operations.

A. Contest with CQ Zone transmission, i.e.: CQ WW DX Contest. Control number: RST plus CQ Zone (i.e., 599 05). Go to program preferences “Auto Contest” tab and change values of two bottom fields with macros <NUMBER_SEND> and <NUMBER_PREV_SEND>. Change it to your CQ Zone i.e., 05. If you have not changed the default program settings, then everything is ready for the contest.
B. Contest with QSO serial number transmission, i.e.: OCEANIA DX Contest. Control number: RST plus serial number, beginning with 001. Go to program preferences “Auto Contest” tab and change bottom field with macros <NUMBER_SEND> to <COUNTER_NT>, change bottom field with macros <NUMBER_PREV_SEND> to <COUNTER_PREV_NT>. When field <NUMBER_SEND> contains macros <COUNTER…>, the program starts displaying counter field in the contest window. You can choose any format (digit-letter) of counter, take a look at macros manual. If you have not changed the default program settings, then everything is ready for the contest.
As well as in the automatic mode of regular QSOs, there are two sub-modes in contest mode: “CQ mode” and “ANS mode”: CQ mode – it’s when you are transmitting CQ, ANS mode – when you are answering to CQ. You can switch between them with Mode button or activate them with F1-F10 keys.
Let’s take a look at “ANS Mode” (sub-mode button should looks like ANS Mode), i.e., you are listening to callsign CQ G1GG TEST and want to call him. To do that you should do following steps:
• Enter G1GG to Callsign field press Enter
CW Keyer will start sending command from <AUTO_CONTEST_ANS_1> field, by default it has <MY_CALLSIGN>, as a result you’ll hear A1AA, where A1AA – your callsign. Keep pressing Enter until G1GG answers you.
• When G1GG will answer you, press Space, program will focus Received field. If you have not heard the number that the correspondent transmitted, press Enter again, CW Keyer will transmit NR?. If you have successfully accepted the contest number, enter it in the Received field and press Enter. CW Keyer will start sending command from <AUTO_CONTEST_ANS_2> field and will focus Callsign field. It happens that the correspondent did not hear your control number and asks you to send it again, in this case, simply press Enter while being in the empty Callsign field. CW Keyer will start sending command from <AUTO_CONTEST_ANS_3> field, which contain your previous control number.
R <WPM_50><DX_N_RST> <WPM_25><NUMBER_SEND>
Let’s take a look at “CQ Mode” (sub-mode button should looks like CQ Mode), i.e., you want to transmit CQ A1AA TEST.
• Press Enter being in Callsign field. CW Keyer will start sending command from <AUTO_CONTEST_CQ_1>: CQ <MY_CALLSIGN> <WPM_40>TEST, as a result you’ll hear CQ A1AA TEST. Keep pressing Enter until someone answers you. Let's say you have not fully heard the correspondent's callsign, enter a part of his callsign i.e., G1 and press Space, CW Keyer will start sending G1? The correspondent will repeat his callsign. If journal already contains QSO with this correspondent on the selected band, the CW Keyer will start sending the command from the <AUTO_CONTEST_CQ_5> field: G1GG QSO B4. If the correspondent is new, then the CW Keyer will start sending your control number from <AUTO_CONTEST_CQ_2> field: <DX_CALLSIGN> <WPM_50> <DX_N_RST> <WPM_25><NUMBER_SEND>, as a result you’ll get 5NN 001. After that, the program will focus on Received field, where you will have to enter the correspondent's control number.
• It happens that the correspondent did not hear your control number and asks you to send it again, in this case, simply press Enter, being in empty Received field, CW Keyer will start sending command from <AUTO_CONTEST_CQ_3> field: <WPM_50> <DX_N_RST> <WPM_25><NUMBER_SEND>, as a result you’ll get 5NN 001. Let's imagine that the correspondent accepted your report and send his control number. Enter the correspondent's control number in the Received field and press Enter. CW Keyer will start sending command from <AUTO_CONTEST_CQ_4> field: TU <AUTO_CONTEST_CQ_1>, as a result you’ll get TU CQ A1AA TEST. Program will add QSO to journal and will return focus to Callsign field.
Note that you can change the key speed through macros <WPM_N>. In contests, monotonous information such as CQ and 5NN can often be heard transmitted at high speeds, but when the control number is transmitted the key slows down.
8. Export to .Cabrillo
In most cases, after the contest, you will need a file in the .Cabrillo format, which is necessary to send to the organisers of the competition to count the results. Currently, the HAM Radio CW Keyer application does not support this format (it is possible that this functionality will appear in future versions). To obtain a .Cabrillo file perform the following operations:
1. Export the contest log to .ADIF format from the HAM Radio CW Keyer program
2. Open RUMLogNG journal
3. Chose menu Contest – New Contest
4. Choose desired contest from available contest’s data base
5. Open this contest file in RUMLogNG contest window
6. Choose menu Contest – Import ADIF… and import your .ADIF file created at step 1. RUMLogNG program should successfully import your contest QSOs and show it in window.
7. Verify that all QSOs are in place, edit them if necessary, and create a .Cabrillo file by doing the following: Menu Contest – Export to Cabrillo… If necessary, open the file and edit the required file fields manually.
9. Examples of YAESU and ICOM transceiver settings
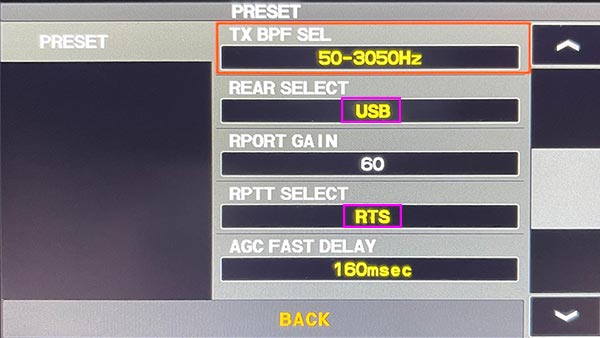
YAESU FTDX10
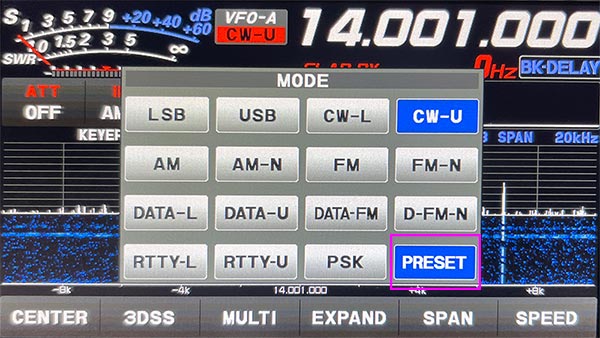
Turn on PRESET mode, press it for a second to enter its settings
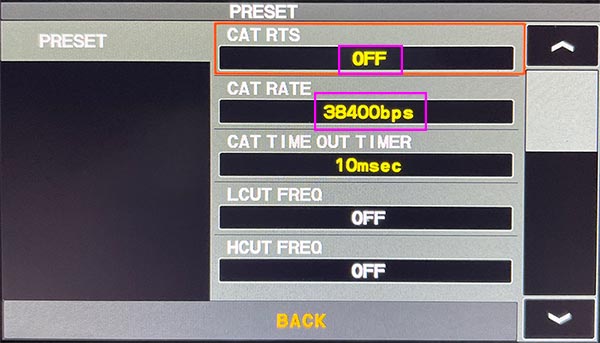
Customize the parameters highlighted in purple based on screenshots
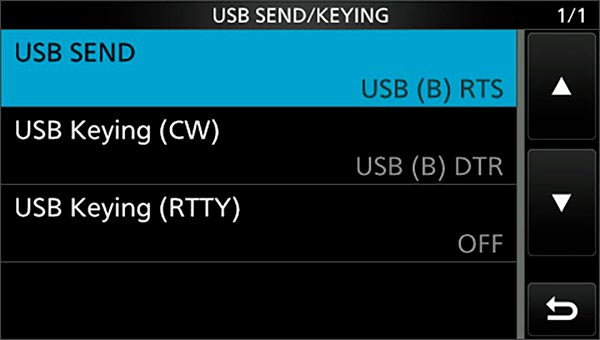
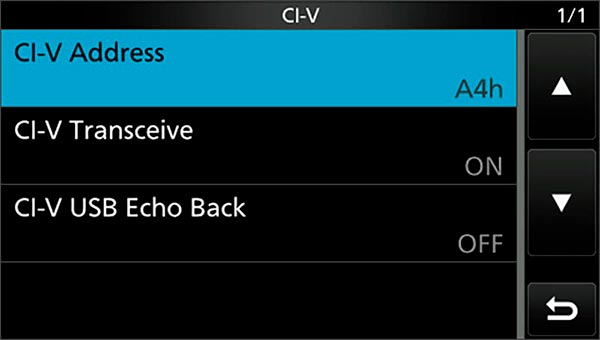
ICOM 705
Go to Part 1
Go to Part 2