HAM Radio CW Keyer - Operations Manual Part 2
Download page
Go to Part 1
Go to Part 3
5. Auto mode QSO

To make QSO in automatic mode you should enable it in Preferences “Auto Mode” tab. This mode has two sub-modes “CQ mode” and “ANS mode”: CQ mode – it’s when you are transmitting CQ or CQ DX, and ANS mode – when you are answering to CQ. Program takes all the commands from this “Auto Mode” tab.
Let’s take a look at “ANS Mode” (sub-mode button should looks like ANS Mode), i.e., you are listening to callsign G1GG and want to answer him. To do that you should do following steps:
• Enter callsign G1GG to Callsign field and press Enter
CW Keyer will start sending command from <AUTO_ANS_1> field, by default it has <DX_CALLSIGN> DE <MY_CALLSIGN>, as a result you’ll hear G1GG DE A1AA, where G1GG is a dx callsign, and A1AA – is your callsign. You could repeat this step until G1GG answers you.
• When G1GG will answer you, press Space or Tab, program will focus TX field. You can enter RST TX or leave it by default 599 and press Enter. Enter RST RX, press Enter, enter dx operator’s name, press Enter, enter DX QTH, wait until the end of G1GG transmitting and press Enter being in QTH field. CW Keyer will start sending command from <AUTO_ANS_2> field. You could edit this field in program preferences or leave as default.
• When G1GG will stop answer to your previous message you can finish QSO by pressing Enter key being in QTH filed again. CW Keyer will start sending command from <AUTO_ANS_3> field. By default <AUTO_ANS_3> field contains <LOG> macros, after execution it QSO will be added to journal.
Let’s take a look at “CQ Mode” (sub-mode button should looks like CQ Mode), i.e., you want to transmit CQ or CQ DX. Press DX toggle button to transmit command from <AUTO_CQ_2> field (by default CQ DX CQ DX DE <MY_CALLSIGN> <MY_CALLSIGN> PSE K) or turn this button off to transmit command from <AUTO_CQ_1> field (by default CQ CQ CQ DE <MY_CALLSIGN> <MY_CALLSIGN> PSE K). Also you can control these two sub-modes via F1 – F2 keys, if command contains string “CQ” or “CQ DX”, CW Keyer will automatically turn on desired sub-mode.
• Press Enter being in Callsign field. CW Keyer will start sending command from <AUTO_CQ_1> or <AUTO_CQ_2> field (depending on selected sub-mode), CQ CQ CQ DE <MY_CALLSIGN> <MY_CALLSIGN> PSE K, as a result you’ll hear CQ CQ CQ DE A1AA A1AA PSE K. Keep pressing Enter until someone answers you.
• Enter DX Callsign and press Enter or Space, program will focus TX field, enter RST TX or leave it by default 599, press Enter. CW Keyer will start sending command from <AUTO_CQ_3> field:
<DX_CALLSIGN> DE <MY_CALLSIGN> = GA DR OM ES TNX FER CALL = UR RST <DX_N_RST> <DX_RST> FB = OP IS <MY_NAME> <MY_NAME> ES QTH IS <MY_QTH> <MY_QTH> = HW? <DX_CALLSIGN> DE <MY_CALLSIGN> BK
• Wait until the end of previous transmitting operation and being listening to dx answer try to fill RX, Name and QTH field. After waiting your turn being in QTH field, press Enter. CW Keyer will start sending command from <AUTO_CQ_4> field:
<DX_CALLSIGN> DE <MY_CALLSIGN> = R R R FB DR OM <DX_NAME> <FR_DX_QTH> FB CFM = TNX FER CALL ES QSO HPE CUAGN ES VY 73 BEST DX DR OM <DX_NAME> = <DX_CALLSIGN> DE <MY_CALLSIGN> TU EE
• Wait until the end of previous transmitting operation and the end of DX transmitting, press Enter. CW Keyer will start sending command from
73 TU EE
You can point mouse to any field and take a look for a hint. You can rewrite the commands to suit your needs in the application settings in the “Auto Mode” tab.
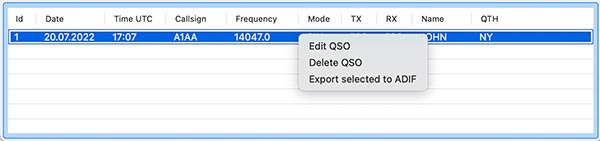
6. Journal
All completed QSOs are stored in the journal. Journal has limited functionality and is intended for temporary storage of QSOs. At first program startup you will be prompted to create a new journal file, to do that go to Journal – New Journal. It is recommended to export the log to .ADIF format after each working session, followed by uploading it to the log, such as RumLogNG (mac os) or Log4OM (windows). Journal functionality is available through the context menu that appears when you click the right mouse button. You can delete records, export selected records to .ADIF, edit records by double-clicking.
Go to Part 1
Go to Part 3